How to Edge Your Lawn with Concrete Edging Stone or Metal Edging
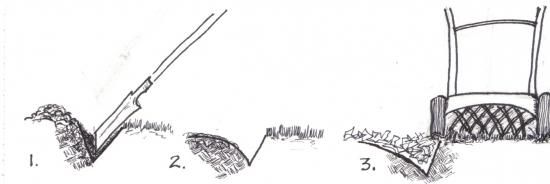
Here at Gertens, we offer professional advice on how to edge your lawn with concrete edging stone or metal edging--two great alternatives to vinyl. The option you choose will be determined by the type of look you are trying to achieve and your budget. Many alternatives to vinyl require starting with a basic trench and then, depending on which option you choose, this trench is further manipulated to accommodate the edging product. The drawings below take you step-by-step through the installation process as it pertains to various options.
If you have a lot of edging to install, you may wish to rent a bed edging machine. The cost of the machine rental is well worth the savings in labor to dig the trench. There are a few different varieties. The most common is comprised of a rectangular box which houses a steel blade. One side has a heavy rubber flap through which the soil from the trench is deposited in a pile. There is a handle and gears attached. Start the machine then elevate the blade prior to engaging. While engaged, slowly lower it onto the starting point and pull the machine along the line you have laid out for your edging. Be sure you have the machine in the proper orientation so the soil is being deposited on the garden side.
 |
| This is a Basic Trench edge, which is very common. |
BASIC TRENCH with Mulch
This is the basis or beginning step for installation of most types of edging. As noted in drawings 1 and 2, using a flat bottomed spade, create a “V” trench. Take the soil from this and put it onto the garden side. Then smooth the slope on the garden side and break up any clods of soils, raking them into the garden. In this option, the trench is your edge or dividing element. All you need do is lay down your mulch, and the trench acts to hold it in place and separate it from the grass. You can place the wheel of your mower on the mulch in the trench. This type of edge does periodically need refreshing. Simply rake the mulch out of the trench, use your flat bottomed spade to freshen up the walls of the trench, and rake back the mulch.
 |
| Trench Edge with Rock(s), similar to basic trench, fill in slightly above mulch line. |
BASIC TRENCH with Small Boulders
Follow steps 1 and 2 for creating your basic trench, then fill with small boulders (rip-rap size/2-10 inches) or small boulders (8-10 inches) in size.
MODIFIED BASIC TRENCH with Metal Edging
 |
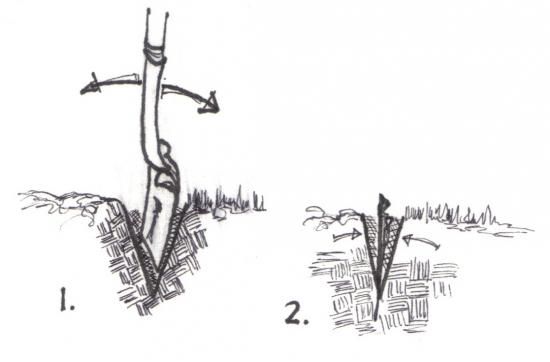
| The Modified Trench with Metal Edging requires you to wiggle the shovel to dig. |
When installing metal edging (i.e. steel or aluminum), you do need to dig a trench. You do not just pound in the edging. Using the same flat bottom spade, put it into the soil to the desired depth and create a narrow “V” by rocking the spade forward and back creating a trench that is just wide enough to accommodate the edging. The reason you do not need a wider opening, as with vinyl edging, is because the spikes are pounded in vertically rather than horizontal or perpendicular to the vinyl edging. Place your edging into the trench to the desired depth, usually leaving about ¾-1 inch above grade. Then push the soil back up to the edging.
 |
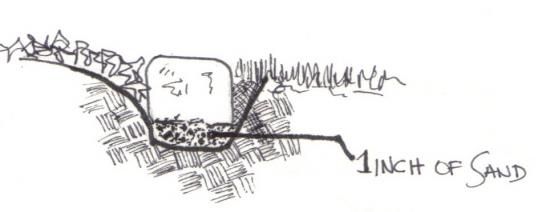
| With the Modified Trench with Pavers or Edging Stone, don't forget the sand! It keeps pavers straight. |
MODIFIED BASIC TRENCH with Paver, Natural or Concrete Edging Stone
Follow steps 1 and 2 for creating your basic trench, than widen the bottom to accommodate the edger you are using. Be sure the trench is deep enough to accommodate the edger and 1 inch of sand, used to facilitate leveling. The edging should follow the grade, with each end leveled to the one next to it.


